Install Ghost CMS on a Ubuntu 16.04 VPS
Note: As of July 2017 this is out of date.
I previously had a project running Ghost on Digital Ocean using their setup guide for Ghost on a small Digital Ocean droplet running Ubuntu 14.04 LTS. This was working fine, but I’ve since decided to check out Vultr and wanted to get it setup using Ubuntu 16.04 LTS. I started by using the many guides available online, but none specifically addressed some of the changes of Ubuntu 16.04 and many commands were not working.
This guide will walk you through the steps I took to install Ghost CMS on Ubuntu 16.04 LTS using Nginx as a web-server/proxy and Let’s Encrypt for security and to enable HTTP/2.
New Server
The first step is of course to setup a VPS of your choice using Ubuntu 16.04 LTS, this can be done locally in a virtual machine or using one of the many online services offering SSH access. I’ve chosen Vultr, because it seems to perform slightly better than Digital Ocean in my limited testing. I won’t go into specifics on getting started, you should be somewhat familiar with those steps; otherwise I recommend following this guide ==through step 6== before continuing.
Ghost Installation
Let’s start by logging-in with your new non-root user if you haven’t already.
ssh username@ip-address or hostname
Ghost Dependencies(zip,wget,unzip,nodejs,npm)
At this point it will ask for your password if you chose not to setup key authentication. Next we will update the apt package manager and install some Ghost dependencies.
sudo apt update

sudo apt install wget unzip nodejs-legacy npm
Install Ghost
The next steps will be creating a directory for Ghost and install the necessary packages/software. Ghost.org recommends to install Ghost in var/www/ghost, so that is where we will install it.
First, we will create a directory /var/www/ and then download the latest version of Ghost from Ghost’s GitHub repository:
sudo mkdir -p /var/www/

cd /var/www/

sudo wget https://ghost.org/zip/ghost-latest.zip
Now that we have obtained the latest version of Ghost, we have to unzip it, change our directory to /var/www/ghost/, and install the Ghost package downloaded along with production dependencies :
sudo unzip -d ghost ghost-latest.zip

cd ghost/

sudo npm install --production
Ghost is now installed, but it is not ready to go yet. We still have some configuration to do.
Configuring Ghost
By default Ghost’s configuration file should be located at /var/www/ghost/config.js. However, no such file is installed with Ghost. Instead, the installation includes config.example.js.
Copy the example configuration file to the proper location. Be sure to copy instead of move so you have a copy of the original configuration file in case you need to revert your changes.
sudo cp config.example.js config.js
The URL and mail settings, which are in the ‘production’ section, are the key areas of information which need modification. The URL is necessary. Otherwise, the links will take you to the default my-ghost-blog.com page. Ghost can function without the mail settings, but it is recommended that you add them. As of writing, Ghost only requires the mail setup in case a user forgets their password. Ghost has a page with directions for different mail configurations, I will show how to setup with Google Gmail in this example, but there are other options such as Mailgun.
We need to open the Ghost config file for editing using the nano text editor.
sudo nano config.js
You have to change the value of url to whatever your domain is (or you could use your server’s IP address in case you don’t want to use a domain right now). This value must be in the form of a URL. For example, http://example.com/ or http://0.0.0.0/. If this value is not formatted correctly, Ghost will not start.
Also change the value of host in the server section to 0.0.0.0.
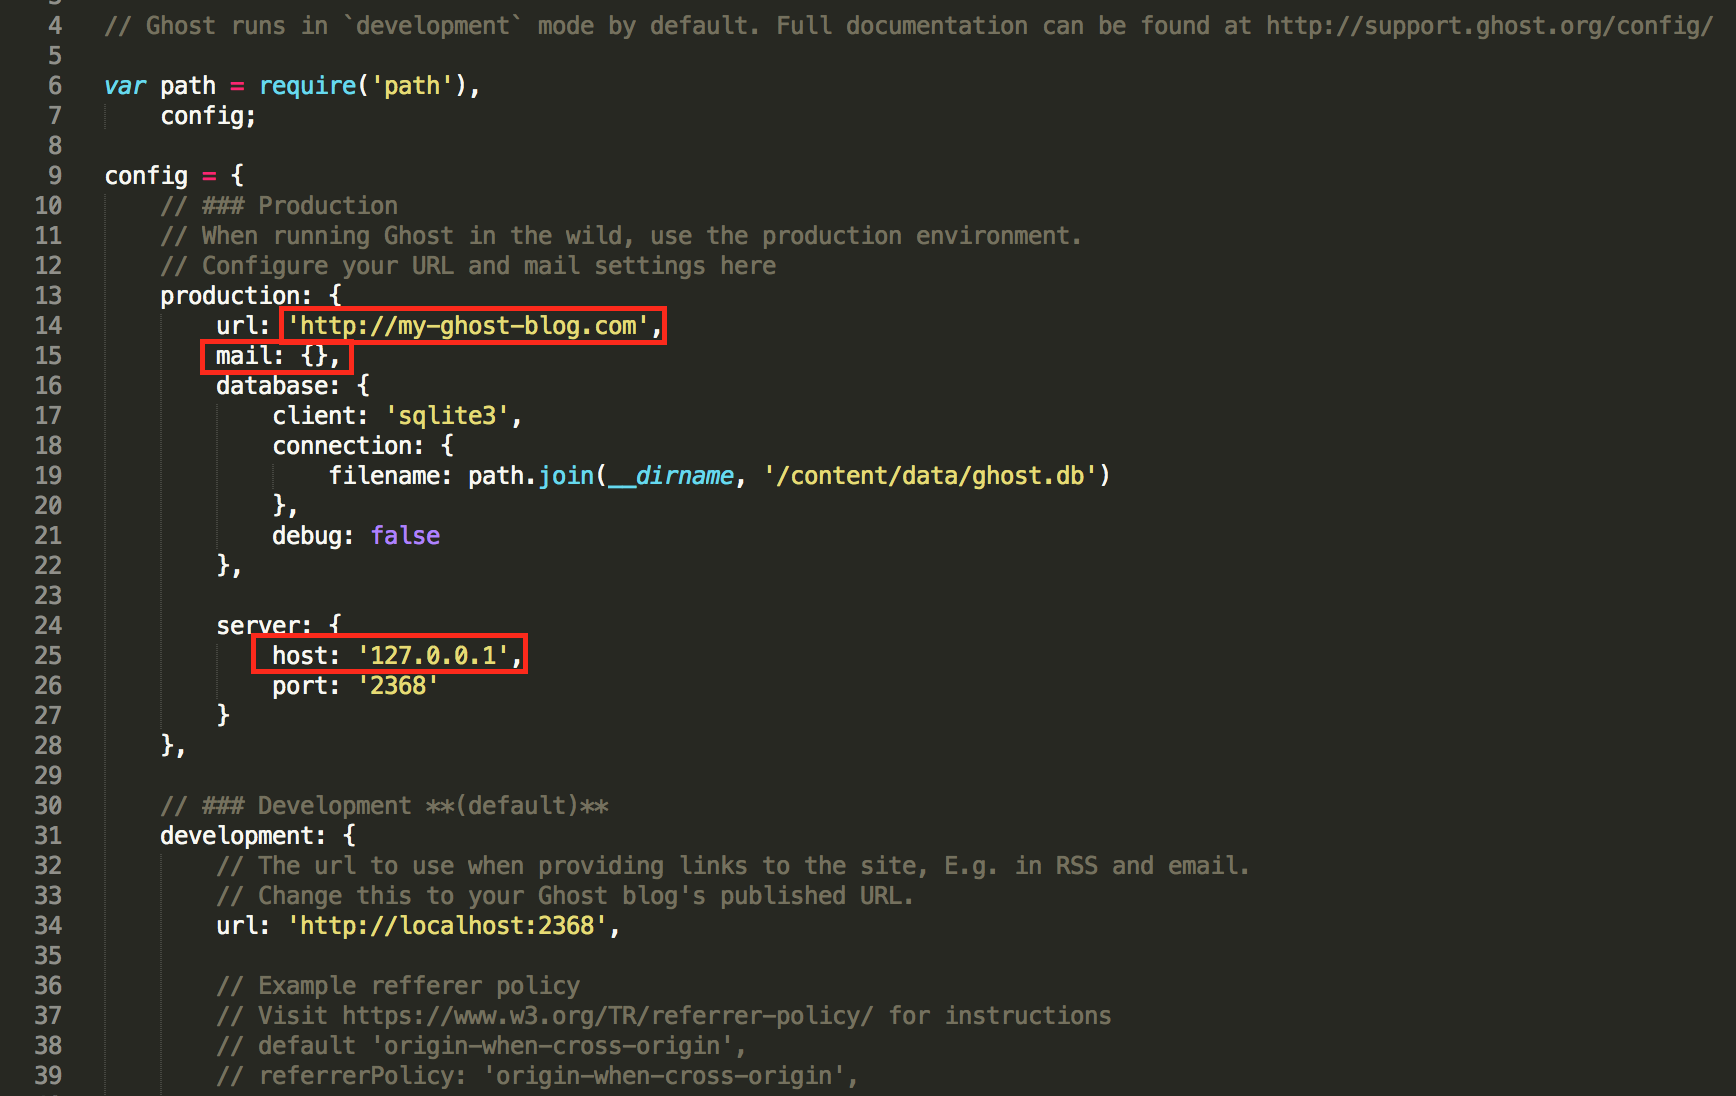
The following in an example of the default config file at /var/www/ghost/config.js:
var path = require('path'),
    config;

config = {
    // ### Production
    // When running Ghost in the wild, use the production environment
    // Configure your URL and mail settings here
    production: {
        url: 'http://my-ghost-blog.com',
        mail: {
            // Your mail settings
        },
        database: {
            client: 'sqlite3',
            connection: {
                filename: path.join(__dirname, '/content/data/ghost.db')
            },
            debug: false
        },

        server: {
            // Host to be passed to node's `net.Server#listen()`
            host: '127.0.0.1',
            // Port to be passed to node's `net.Server#listen()`, for iisnode s$
            port: '2368'
        }
    },

(...)
The items surrounded by red boxes in the image below need to be changed as instructed above.
You can obtain the proper server information for Google Gmail here, and we will use this information along with login credentials to setup outgoing mail. This applies to any provider, but for Google I would recommend setting up 2FA(Two-Factor Authentication) along with an App-specific password for greater security. Alternatively, if you are expecting higher email volume or wish for greater security/control, you can setup Ghost with an email transport/delivery provider such as Mailgun.
This is an example of /var/www/ghost/config.js with email properly configured for Gmail.
var path = require('path'),
    config;

config = {
    // ### Production
    // When running Ghost in the wild, use the production environment
    // Configure your URL and mail settings here
    production: {
        url: 'http://my-ghost-blog.com',
        mail: {
            from: '"Custom Name" <myemail@address.com>',
            transport: 'SMTP',
            options: {
            service: 'Gmail',
                auth: {
                    user: 'youremail@gmail.com',
                    pass: 'yourpassword'
                    }
                }
        },
        database: {
            client: 'sqlite3',
            connection: {
                filename: path.join(__dirname, '/content/data/ghost.db')
            },
            debug: false
        },

        server: {
            // Host to be passed to node's `net.Server#listen()`
            host: '127.0.0.1',
            // Port to be passed to node's `net.Server#listen()`, for iisnode s$
            port: '2368'
        }
    },

(...)
Save the file and exit the nano text editor by pressing Control+X then at the prompt Y and finally ENTER.
While still in the /var/www/ghost directory, start Ghost with the following command:
sudo npm start --production
If you set host to ‘0.0.0.0’, you should be able to access your blog in a browser using port 2368: http://your_domain_name:2368 (or http://servers_ip_address:2368), if you set host to ‘127.0.0.1’ this should not work and you will need to complete the steps below before you will be able to easily access your Ghost install remotely. Press Control+C in your terminal to shutdown the Ghost instance. We do not want to run Ghost this way, but this is suitable for testing before we move forward. There are many other Ghost options that can be configured using this file. Visit Ghost: Configuring Ghost for more information.
Install Nginx with Easy Engine
We will now install the latest version of Easy Engine which uses Nginx web-server. I won’t go into the specifics of why using Nginx is preferred over Apache or another web-server, but feel free to do some research.
As it is configured now Ghost is only available locally over port 2368, and we want it to be available over the default HTTP port 80 and we will also use Nginx to take the load off of the Ghost CMS software since Nginx is optimized for serving content, though Node is very quick.
Install Easy Engine with the following commands:
wget -qO ee rt.cx/ee && sudo bash ee
We will now need to create a ‘site’ within EasyEngine. There are many commands or their site, but we are looking for the following:
ee site create example.com --proxy=127.0.0.1:2368
Easy Engine IPv6 Fix: as of writing (2016-10-03), Easy Engine does not include the proper configuration for IPv6 access in Nginx. As a result, you will get the dreaded “Welcome to Nginx” instead of your application or site when attempting to access it via IPv6. IPv6 is often the default for most modern browsers when given the choice of IPv4 vs IPv6. This is fairly easy to remedy, as shown in the following instructions:
cd /etc/nginx/sites-available

sudo nano example.com
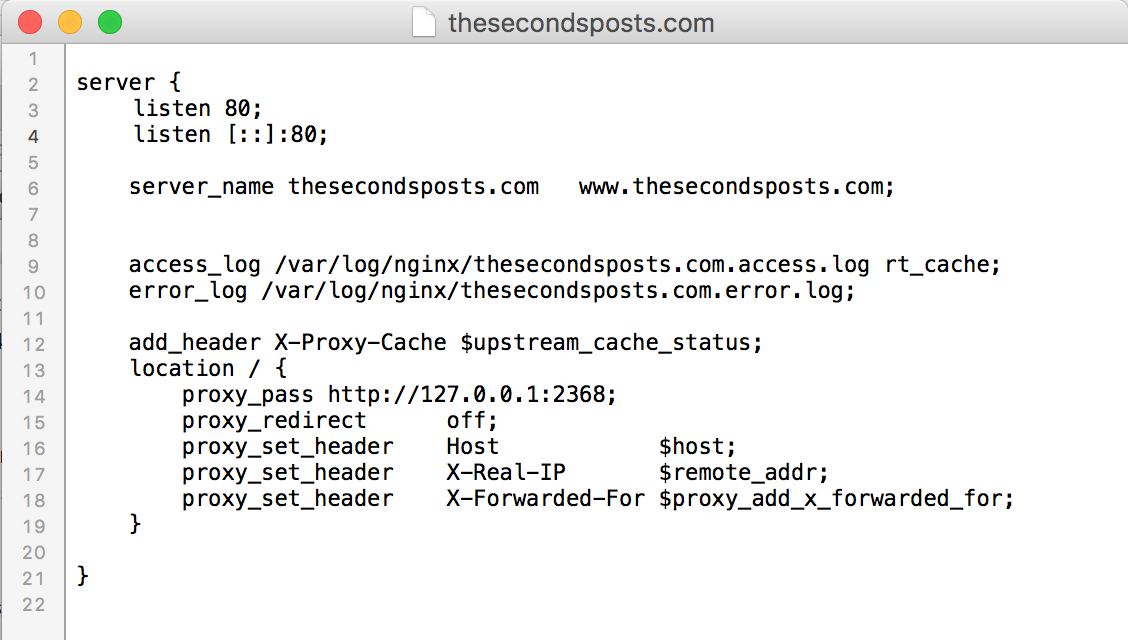
Just after server {, add the following two lines:
listen 80;
listen [::]:80;
It should look like the following image when edited correctly:
 After you’ve saved by pressing
 Control+X then at the prompt Y and finally ENTER, you will need to restart Nginx sudo service nginx restart and test your site. Your application/site should now be available over IPv4 and IPv6.
Once this is completed you have now installed Nginx web server as a proxy to Ghost from port 80⁄443 to 2368. Using Easy Engine allows for easier setup and maintenance, it also has a Let’s Encrypt client included. ####(Optional) Install Nginx without Easy Engine If you have chosen not to use Easy Engine, you can Install Nginx with the following commands:
sudo apt-get install nginx
Next, we will have to configure a site by changing our directory to /etc/nginx and removing the default file in /etc/nginx/sites-enabled:
cd /etc/nginx/

sudo rm sites-enabled/default
We will create a new file in /etc/nginx/sites-available/ called ghost and open it with nano to edit the configuration file:
sudo touch /etc/nginx/sites-available/ghost

sudo nano /etc/nginx/sites-available/ghost
Paste the following code in the file and change the domain name to match your domain, or your servers IP address if you don’t want to add a domain now:
server {
    listen 80;
    server_name your_domain.com www.your_domain.com;
    location / {
        proxy_set_header   X-Real-IP $remote_addr;
        proxy_set_header   Host      $http_host;
        proxy_pass         http://127.0.0.1:2368;
    }
}
Save the file and exit the nano text editor by pressing Control+X then at the prompt Y and finally ENTER.
We will now symlink our configuration in sites-enabled and restart nginx:
sudo ln -s /etc/nginx/sites-available/ghost /etc/nginx/sites-enabled/ghost
sudo service nginx restart
Convenience, Security and Wrap-Up
Ghost User
Next we will create another new user. This user would be granted only the privileges to do stuff in the directory /var/www/ghost. This is a security measure. If Ghost gets compromised, your system would be somewhat protected. This can be done by running this command:
sudo adduser --shell /bin/bash --gecos 'Ghost application' ghost

sudo chown -R ghost:ghost /var/www/ghost/
Now login as the new ghost user created and we’ll test Ghost and Nginx together:
su - ghost

cd /var/www/ghost

npm start --production
In your browser, visit http://<server_ip_address>/ or http://<server_domain_name>/. If this succeeds, close Ghost by pressing Control+C in your terminal window, we still have some steps to finish. We also need to revert to the user you first created, we don’t want to install this software using the ghost user. In your terminal window enter:
exit
This should show the previous username instead of ‘ghost’ next to your cursor.
Firewall and SSH Security
I recommend at least configuring UFW, but even better would be Fail2Ban since it can protect SSH and Nginx, among other services, against brute force attempts and other types of attacks as well.
Autostart and Keep Ghost Running
Obviously you don’t want to need to login an run terminal commands to restart Ghost anytime it crashes or the server is restarted. For this reason we will setup Ghost to be started automatically by a service called ‘supervisor’.
Let’s install and run supervisor:
sudo apt install supervisor

sudo service supervisor start
Now we need to configure supervisor to for Ghost by creating a config file in /etc/supervisor/conf.d/ghost.conf using nano text editor:
sudo nano /etc/supervisor/conf.d/ghost.conf
There you can paste the following configuration for Ghost:
[program:ghost]
command = node /var/www/ghost/index.js
directory = /var/www/ghost
user = ghost
autostart = true
autorestart = true
stdout_logfile = /var/log/supervisor/ghost.log
stderr_logfile = /var/log/supervisor/ghost_err.log
environment = NODE_ENV="production"
Save the file and exit the nano text editor by pressing Control+X then at the prompt Y and finally ENTER.
We now need to run the commands below to for supervisor to read the updated/new configuration file we’ve added, start supervisor at boot, and start ghost using the supervisor configuration we’ve created:
sudo supervisorctl update

sudo supervisorctl reread

sudo systemctl enable supervisor.service

sudo supervisorctl restart ghost
Ghost should be available in your browser at this point. If so, we can continue onto setting up SSL/TLS using Let’s Encrypt in Nginx.
Install Let’s Encrypt SSL/TLS
Let’s Encrypt requires that your site be configured with a domain name that is pointing to your server. If you are using an IP address only or do not have a domain pointing to the correct location then the following will not work.
For setup without EasyEngine, I used the Digital Ocean Ubuntu 16.04 Let’s Encrypt Nginx Tutorial and modified several parameters for improved security such as removing some outdated ciphers and testing with Qualys SSL Labs tester.
With EasyEngine: I had some issues getting Let’s Encrypt to work with a proxy site initially. After doing some searching and trying a few things, I came up with this solution:
sudo nano /etc/nginx/sites-available/example.com
You should have the Nano text editor visible now, with your Nginx configuration file for your proxy site. Find where it says:
    add_header X-Proxy-Cache $upstream_cache_status;
    location / {
        proxy_pass http://127.0.0.1:2368;
        proxy_redirect      off;
        proxy_set_header    Host            $host;
        proxy_set_header    X-Real-IP       $remote_addr;
        proxy_set_header    X-Forwarded-For $proxy_add_x_forwarded_for;
    }

}
Edit the line that says location / { so that it reads location ~* / { as shown below:
    add_header X-Proxy-Cache $upstream_cache_status;
    location ~* / {
        proxy_pass http://127.0.0.1:2368;
        proxy_redirect      off;
        proxy_set_header    Host            $host;
        proxy_set_header    X-Real-IP       $remote_addr;
        proxy_set_header    X-Forwarded-For $proxy_add_x_forwarded_for;
    }

}
Afterwards run the following commands:
sudo ee site update example.com --letsencrypt
If Let’s Encrypt is successful then we can move on to the next steps:
sudo nano /etc/nginx/sites-available/example.com
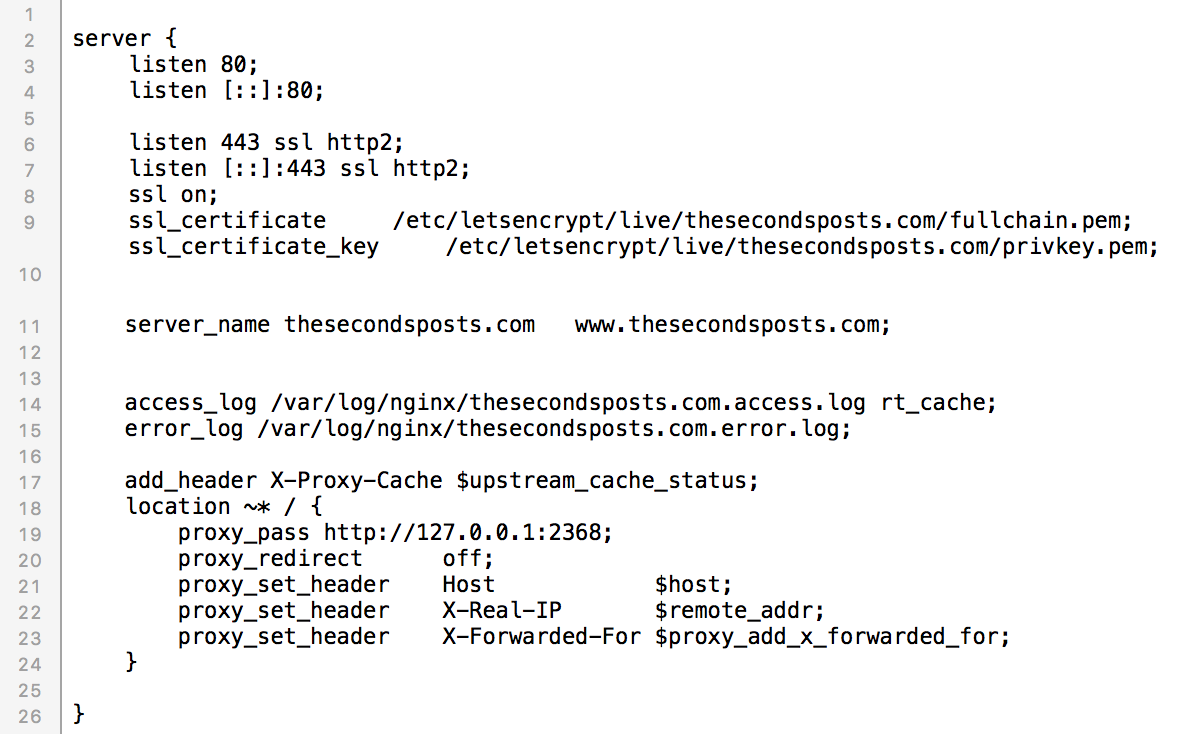
Add the lines below to the Nginx configuration so that it follows the example shown afterwards:
listen 443 ssl http2;
	listen [::]:443 ssl http2;
	ssl on;
	ssl_certificate     /etc/letsencrypt/live/thesecondsposts.com/fullchain.pem;
	ssl_certificate_key     /etc/letsencrypt/live/thesecondsposts.com/privkey.pem;